I've been saying I'd put a beadboard tutorial up for sometime now...and we finally got around to doing it! It really is so easy and hopefully this proves that so you are motivated to do it yourself!
Beadboard is typically sold in 4x8 feet sheets (four wide by eight tall). Lowes and Home Depot both sell it, but I noticed Lowes also sells the pieces where the space in between the grooves is wider...which I prefer. One sheet costs between $20 and $24. You will most likely need cuts for your project, so make sure you go with exact measurements so they can help you with this (unless you are lucky and own an electric saw!) This particular beadboard was purchased at Best Woods in Orem (take the Center Street exit and head West...on the right hand side). We had left over from a different project and used our 2 feet pieces to do a wainscoat on the top part of one of the nursery walls.
Once you have your pieces measured, hold them up to the wall piece by piece to make sure they fit together well. Some wall spaces are uneven which you have to compensate for. For our project McKay had to break up a corner of the drywall to have the beadboard fit evenly into place.
Before hanging, find where the studs are in the wall (in case you haven't done this before, stud finders are fairly inexpensive...once you find one, they should be 18" apart).
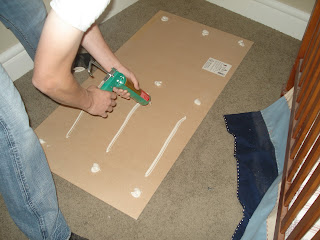
Liquid Nail makes it very easy to put beadboard up...about $2 a container at Lowes (the applicator guns are about $6).
This is how McKay applied it...don't be afraid to use plenty to keep the beadboard secure. If you use this, there's not a need to rent or use a nail gun. It stays in place with a few finish nails placed in each stud location.
I didn't take a picture of this step because I was helping, but have two people place the board in place. One person will need to hold it securely in place while the other hammers the finish nails in. Liquid Nail dries in just a few minutes so once the finish nails are in place you are usually good to let go. Continue with these steps until each piece is in place.
To finish off the project it's best to add trim to the top and bottom. We used a crown molding piece for the top and a 6" baseboard piece for the bottom. I plan to add hooks along the bottom piece to hang pictures. Lowes cut both pieces to size for me (although their saw was down so a nice man used a hand saw).
Last thing to do it paint! Caulk the nail holes so they are flush with the wall. Let dry and paint! We use Ralph Lauren Wash Basin in our house which is a good soft white color.
Including paint time this whole project took about four hours. McKay had the beadboard up in an hour and a half! You will save yourself a few hundred dollars by doing it yourself!


No comments:
Post a Comment