Wednesday, August 31, 2011

A New Swing


My mother-in-law had this porch swing in desperate need of attention.  So, the other weekend I set out to recover it!


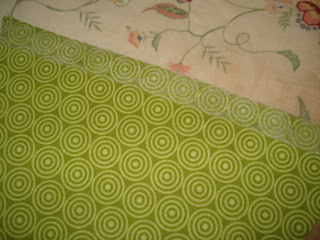
Found this great fabric at Hobby Lobby in the decorator fabric's section.  It is heavy and will stand up well to the elements.


I made a simple 1 inch seam all the way around, leaving a channel for elastic.  Using 5/8" elastic, I threaded it through the entire thing leaving elastic tails at each end.


Place it over the cushion and pull to desired tightness.  Remove, sew elastic together, and then sew seam shut.


With a coat of brown spray paint and the recovered-cusion, it is a brand new swing!  Recovering cushions is just that easy.  Simply measure your project to be recovered, allow for 1" seams on both sides, sew slip cover, cover cushion, and you are done!

Tuesday, August 30, 2011

The Perfect Bow

Hobby Lobby has a great selection of bolts of ribbon.  They are usually 50% off, so you can spend less than $3 for an entire bolt.

Start by cutting a length of ribbon 19".  Make a figure 8 and then sew with a needle and thread through the middle to secure the ribbon.  Repeat 3-4 times with the same and coordinating ribbon.


Layer the ribbon in your hand.


Sew through the middle to secure all pieces together.


 Tie a knot in a skinny coordinating ribbon.

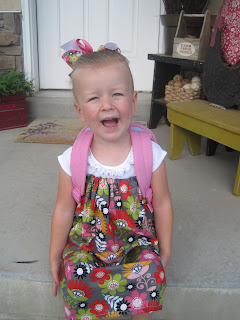
Wrap around center of bow and sew to back of ribbon.  Add a pinch clip to the back.  I used the coordinating skinny ribbon and made a few more figure 8s.  Khloe had the perfect bow to go with her dress for preschool.  Click here for more instructions on darling bows.  They are easy to make and have step by step instructions.

Monday, August 29, 2011

Hobby Lobby Girl Fabrics

My Khloe started preschool this week.  I saw this fabric at Hobby Lobby and had to have it to make a dress for her.  They have such cute fabrics that are always 30% off, so for $5 she had a new dress.  Here are step by step instructions to make yours.  I bought 1 yd of fabric.  Measure height of child from chest to ankle.  Cut off extra.


Hem top and bottom of fabric.


Create a one inch hem at top and thread elastic through opening.  Put a safety pin on one end.  It makes it super easy to thread through.


Fit around child's chest and sew elastic together.


Position coordinating ribbon ties in four spots, two on front and two on back to tie at armpits.


It really is "sew" easy!  Check back tomorrow for how to make darling bows for back to school!

Friday, August 26, 2011

Our Best Bites...

I've been wanting this cookbook for awhile and I got it last night!  I play Bunco with a group of friends and won it!

You can buy it at Costco for around $16.  There are quite a few delicious recipes in here.  They also have a website where they post new recipes all the time.  One I thought I'd link you to is for the Brazilian Lemonade.  I had it at a friends house a few months ago and it is delicious!  If you've ever had one at Tucanos it's very similar!

I'll be trying new things out and sharing what my favorites are!  Hope everyone has a great weekend!

Thursday, August 25, 2011

Hobby Lobby Accessories

I've purchased the shelf for Peyton's room and am now just waiting for the legs of the shelf to come in at IKEA.  In the meantime I'm currently looking for the accessories.  I've found a few...all from Hobby Lobby...and all great prices! 

Letter P sign...$3.00 (half off)
Bike...$12.00 (40 percent coupon)
Metal Jack...$7.00 (half off)

You can always find something great there...sometimes you just have to wander!  I'll share the finished wall in Peyton's room when its ready!

Wednesday, August 24, 2011

Pennant Banner

Using the fabrics I showed you on Monday I finished Peyton's pennant banner!  I really love it and it will add so much to the finished look of his room.  I also did it without sewing one stitch!  Lisa is nice and helps me with my sewing projects but I was excited I learned how to do something without it too!  Here's how...

I started by cutting a pattern for my triangles out of cardboard.  It was about 8 inches across the top.


You can fold your fabric in half to get two triangles at once.  I traced the pattern with a pen and cut. 


To give the triangles thickness I used fusible interfacing (I bought two yards).  I bought it at Nuttall's in American Fork (53 W. Main Street).  I used the pattern to cut the same amount of triangles out of the interfacing (my banner ended up needing 14 triangles). 


To fuse the interfacing, you put the sticky side to the fabric (lining it up perfectly so they bond well), place a thin cloth over the top of the fabric, spray the cloth wet and slowly iron down the fabric...about 15 seconds for each section of the fabric.  The interfacing also comes with instructions on how to do this.


Once all the triangles were backed with interfacing it was time to tie them together.  I also purchased Stitchwitchery bonding tape at Nuttall's.  It's a thin interfacing type material about 1/2 inch wide.  You can't see it really well, but it's laid out on the top of this triangle...


I chose the lemon grass grosgrain ribbon from Walmart to tie the triangles together.  We attached two at a time by laying down the bonding tape first and lining the ribbon up perfectly on top of it.  Same process as above with bonding the interfacing.  You just don't want to do too many at a time so your ribbon stays straight and even. 


Once they were all attached to the ribbon we were done!  Really so easy!  I chose these small hooks from Hobby Lobby ($3.99 each) to hang the banner.


And here's the finished product!


Thanks for your help Lisa!  It turned out great and I can't wait to finish the room!
Tuesday, August 23, 2011

Making Old Things New

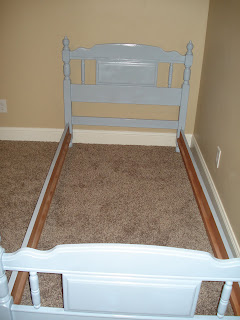
With a new baby coming its time for the bedroom shuffle.  McKay's bed from childhood has been sitting in our garage for years and we decided to refinish it...
My sister in law Melissa had refinished cabinets and instead of sanding they used a primer that worked right over finished wood.  So we decided to give it a whirl and avoid the sanding process.  It worked like a charm!
We've been through the painting process a few times on this blog.  We did two primer coats and two coats of this great blue color...Martha Stewart paint in Hydrangea (semi-gloss).  It matched a blue color in Peyt's bedding perfect. 

The last step was this laquer spray to give it a finish coat.  Lisa told me about it...much easier to use than the oil-based top coats!


And here is the bed all ready to go in his room.  I really love how it turned out!  Thanks to my husband McKay for his work on the project...I'm staying away from paint until January!


Don't let old furniture go to waste!  There's nothing a great color of paint won't fix!

Monday, August 22, 2011

Fun find...The Fabric Mill

My friend Jessica sent me to The Fabric Mill in Orem (414 E. 1400 S., just West of Chuck-A-Rama) to find fabrics for Peyton's pennant banner.  They have a great selection and I found just what I was looking for...


Remember the Sarah Jane fabrics I talked about here?  They carry the boy line!  So very cute...


Can't wait to make the banner now and show you how to do it!

Friday, August 19, 2011

Banana Cream Pie Shots

I had to take a dessert to a wedding shower last month.  Banana Cream Pie shots is what I settled on.  Partyland had the plastic shot glasses and plastic silver mini spoons for cheap.


Aren't they cute?  To make, simply break graham crackers with rolling pin and mix with 2T melted butter.  Layer in the bottom of glass.  Make Jello Instant Vanilla pudding according to directions and add small banana chunks.  Pour it before it sets.  Add another layer of crust, then another layer of pudding.  Top with whipped cream.

Thursday, August 18, 2011

3's


Objects always look better in a grouping of three as we've mentioned before.  I loved these candlesticks for their height, shape, and weight.


I loved this set of three for its color, uniqueness, and whimsy.

Wednesday, August 17, 2011

Not just for the birds


I am a big fan of ceramic birds and have quite a few scattered about the house.  I would love to add these to my house decor.  I love that they are a mix of the birds and a candleholder.


Loved, loved, loved this!  What a great idea to fill a birdcage with a trio of pillar candles.  What an inexpensive solution to a sophisticated look!

Tuesday, August 16, 2011

Emporium Inspiration


There are several places that I love to go and walk around for inspiration.  The Emporium at Thanksgiving Point is one of those places.  I love to just browse through the store admiring all of the pretty things.  Although it is way too pricey, I love the inspiration it gives me to recreate what I see on a budget.  I loved this tray grouping and picture.  It would look great on an entry table.


I also loved this twist on a lantern by filling it with a flower arrangement.  Downeast Home always has great prices on lanterns, and Target sells a similar flower arrangement for under $20.  Find your inspiration!

Monday, August 15, 2011

Paper Journals


My fun find for the day is this easy DIY project using a composition notebook, scrapbook paper, and spray adhesive.  Composition notebooks are super cheap right now, $.44 at Walmart.  I made these for YW for scripture journals.  They loved them, and I finally had a use for all that scrapbook paper in my downstairs closet!  Here's how to make your own.


To begin, spray the backside of a 12x12 sheet with spray adhesive and smooth on to the front cover.  Fold down the top and bottom edges.


Fold in the corners as shown.


Fold over and press down.


Cover with coordinating paper cut 6"x9.5".  Repeat process for back cover.

Friday, August 12, 2011

Lemon Bundt Cake

Thank you to Kallee for sharing pictures and this delicious recipe!  I can't wait to try it...

Lemon Bundt Cake


Cake...
1 lemon cake mix
4 eggs
1/2 cup oil
3/4 cup water
Bundt cake pan (grease and flour well)
(Kallee uses the Wilton Dimensions Cascade Pan - $30.99 on Wilton.com)

Blend together and bake at 325 for 40.45 minutes.  Cool cake in pan for 10 minutes.

Glaze...
1/2 cup lemon juice
2 cups powdered sugar

Blend ingredients (picture below shows consistency)


When the cake is removed from pan, poke holes around cake.  Pour some glaze over the cake to fill the holes making the cake moist.


After pouring glaze, add more powdered sugar for an icing consistency.  Pour the rest of the glaze over cake.  Embellish with fresh fruit.


Thanks for sharing this delicious summer dessert recipe Kallee!  You are a beautiful presenter too!

Thursday, August 11, 2011

Sweet Tooth Winner...


The winner of the $10 certificate to Sweet Tooth Faith is Jessica Dunford!  Jessica please email your address to us at doityourselfdivas@gmail.com so we can mail it to you!  Congratulations!

They've just opened a new shop in Orem near University Mall.  Had one just yesterday...so delicious!