Tuesday, February 28, 2012

A table refresher

 While I would love to buy a brand new beautiful kitchen table and chairs, it's just not in the budget right now.  Our chairs were...well...disgusting.  White cloth chairs and kids just don't mix.


See what I mean?  My friend Raelene was over awhile back and suggested I cover them with leather or vinyl.  So much easier to clean up!  So I went to Joann's and hit their 50 percent off designer fabrics sale and bought 1 1/2 yards of chocolate brown vinyl.

My professional re-upholster Lisa came to the rescue and recovered them for me.  We just unscrewed the cushion, cut the vinyl to size (with enough to wrap around the bottom at least 1 1/2 inches), folded the vinyl around the cushion (so it tucked well on the corners) and stapled it on...


Just a matter of screwing the cushion back on the chair and...


For $28 looking SO much better!  And it's so easy to clean up spills which happen hourly at my home.

With the chairs refreshed I needed new table decor.

Love how it turned out!  Topiary, candle holders and tray came from Taipan (candle holders were $9 and $6!) and table runner, frame, ceramic pieces and berry ball from Rod Works.  Filling a tray can be deceiving and somewhat pricier than expected.  But I love how it turned out and can keep it up year round if wanted!

Thursday, February 23, 2012

A Crafty Girl


We love to feature other's great ideas on our blog.  This nursery for twins, one boy and one girl, is full of great ideas thanks to the mother Courtney.  She's a friend of a friend and has great taste.  Go to her blog for detailed information on her finds and treasures.  We are so glad that she finally got to bring her babies home to their beautiful nursery.  Thanks for letting us share your talents Courtney!


I love the yarn wrapped letters for her Milo and Ruby.  So creative!


Love, love, love the lips and mustache!


This wall grouping is my favorite in the room.  Such great colors.


This shelf is genius!  She turned it upside down!  Now it is the perfect place to hold the unique items.


Hope this inspires some creativity for you!

Tuesday, February 21, 2012

Creating Drama in the Bedroom


So this curtain and rod have been good to me the past nine years in our master bedroom.  I was ready to inject some drama into my room using this wall.


I replaced the rod with a wooden one from Lowes and hung it higher to add height to the window. I purchased the curtains from Ikea, (they are the same ones from Alisa's room), and love the richness they add to the room.


Last year, we bought this painting from a street artist in Paris.  For Valentine's Day, I framed and matted it for Davy.  The custom mat was $6 from Hobby Lobby and the frame was $26.  Using it as my inspiration, I added four other pictures from our time in France at the Eiffel Tower. 


It was such a special trip and one that reminds me of just how much I love my sweet husband.  So, the bedroom is the perfect place to highlight that trip.  These frames are from Pottery Barn.


This was my favorite moment.  We were sailing down the Seine River and got right in front of the Eiffel Tower as it light up.  Perfect time for a kiss.  Look for pictures of you and your sweetheart to place in the bedroom.  It should be your sanctuary!


I love this little grouping that I found for on top of the tv boxes.  (It also hides the cords from my wall mounted tv.)  The book has a picture of the Eiffel Tower and was $6 from TaiPan.  The jar was $3 and the bell $5.  Perfect little grouping of three to tie into my theme.  Now, my master bedroom is complete!

Thursday, February 16, 2012

Finishing touches

Baby Kate's room is all done!  Just thought I'd share the final pieces with you...

This is how her name banner turned out and I love it!  I just made small paper pinwheels for each circle and found the chip board letters (The Paper Studio, $5.99) and flower embelishments ($4.99 in the scrapbook aisles) at Hobby Lobby.


I bought the K from Pottery Barn Kids ($10) for the frame I made awhile back.  I really like the look of their letters even though you might pay a little bit more.


I attempted do it yourself canvases for her room.  I didn't want to pay $40-$50 for them so I bought a two pack of canvases from Hobby Lobby ($5.99), mod podged paper to the sides and mod podged the picture to the front.  I didn't mod podge over the top because I wanted to keep it clean looking.  For $5 including the picture being printed it doesn't look too bad! 


Here's her wall all done! 

Decorating this room really has been a small dream come true :)

Saturday, February 11, 2012

Alisa's Room Makeover

Our dear friend, Alisa is battling stage 4 melanoma for the 3rd time.  Wanting to do something for her, Lindsay, Kallee, and I reached out willing to do anything from dinner to cleaning toilets.  Well, Alisa had something in mind that was right up our alley.  She wanted to redo her front room/office for her husband Josh.  We jumped at the chance to help her and put our love for design in action.


Here is her room before.  The desk was massive, and she needed the piano to stay as well.  She wanted a seating area to enjoy and have an overall relaxing space.  We had our work cut out for us.


With Lindsay at home with Katelyn, Kallee, and I set off to source and find the missing pieces.


The first store we went to was Osmond Design in Orem.  We saw this chair right as we walked in and fell in love.  It was the right scale, shape, size, color, and pattern.


Next, we headed to our favorite consignment shop, Home Again, and found this beautiful piece for much needed storage for the room.  At $160, it was a steal.


Alisa wanted the walls to be gray.  Using the green Frogger tape, we taped the ceiling and painted a coat of white over the tape edge.  Then we carried the gray up the walls and the ceiling to give the allusion of more height.  We left the ceiling white and LOVED how it turned out.  The green tape is the best and leaves no paint bleed!


Here is the finished room.  We couldn't have been happier with the result.  When Alisa saw it and teared up, we knew we had hit a home run.  The room is simply beautiful!


The pair of chairs made the room.  We found the table at Osmond for $69.  The tray also came from Osmond and was only $16.  All of the accessories for the tray came from TaiPan for under $50.


I found this pillow at Target for $25.  It brought such a warmth with the rich color of the stitching. 


Alisa already had the beautiful mirror.  We simply moved the piano to the smaller wall and added the Boxwood wreath over the top of the mirror.  (Great idea Lindsay).  We added simple accessories to the top of the piano.  We found the bookends at Osmond for $16 and added to fake books between them. 


We moved the desk to the big wall, removed the hutch, and created this perfect Pottery Barn inspired wall grouping.  We found the oval clock at TaiPan for $69.  The number plaques came from Pottery Barn for $39.  The picture frames were also from Pottery Barn for around $25-30 with the mats included.  Alisa is a photographer and took the most amazing pictures of a variety of old blue doors while in France.  We picked our 3 favorites for the frames.  It is a great idea to keep a common theme for pictures used as art.


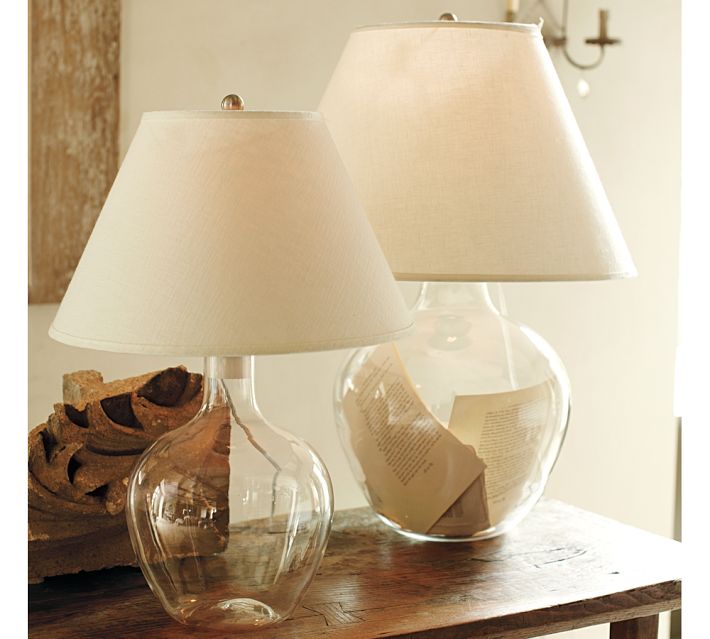
The desk accessories were a steal.  I found the file items at Ikea for $15 out the door.  We saw similar items at World Market for $75.  The lamp was 50% off from Pottery Barn because it was the floor model.  We had to have it for its architectural lines. 


We reused Alisa's gold mirrors and added the jar with greenery, a grass ball, fleur de lis, and the cool book pages as art picture that I posted earlier in the week.  It was the perfect grouping for the top of the storage cabinet.

We found the perfect desk chair and cushion from World Market for $169.  It was pretty easy to assemble.  (I did it in about 30 mins).  It was just what Josh was looking for in a chair.

We had a hard time finding the perfect window treatment.  I found these amazing drapes at Ikea for $60.  They are beautiful and add such beauty to the room.  We hung the rod next to the ceiling to create more drama for the window.  Kallee found the floor lamp at Target for $25 on clearance.  We moved the painting from another spot in Alisa's house as it was perfect for the room.  We couldn't be more pleased with how it turned out and the peace it brings for our dear friends.  We love them and continue to pray for the eradication of her cancer.  We are for hire if anyone needs design help.

Thursday, February 9, 2012

Book pages as Art


Lindsay had the great idea to layer book pages to make our own art piece for a room we were decorating.  Here's how mine turned out.  I just layered the pages in different directions and different sizes, leaving the ripped edges to add texture and dimension.


I also thought that the book pages would make a great decorative detail to a lamp shade.  I simply ripped small pieces and glued them on the shade, layering as I went.

Wednesday, February 8, 2012

Book Nook


Loved the layering of old book pages as a wall treatment in the corner of your house.  Thanks Osmond Design for the great idea.  I want to find a spot in mind to create a reaading corner.  This would also be a great way to back shelves in a book case.

Tuesday, February 7, 2012

Book Pages Day 2


I loved this idea from Pottery Barn to add book pages into a clear jar, or the bottom of this glass lamp base.  Hobby Lobby has a great selection of glass jars as does Forget Me Not.  This would be a great addition to an office or your boy's room.  You can roll up the page and tie it with jute and then fill the jar, like a message in a bottle.

Monday, February 6, 2012

Fun Projects with Book Pages

All this week, I want to show you creative projects using old book pages.


The first is this wreath from Kallee's house.


To make it, just roll up the pages gluing them to a felt circle.  Continue until you've made a complete circle of pages.  Add whatever you like to the top of the felt and add to your favorite wreath. 

Friday, February 3, 2012

Katelyn

 This little princess is the reason for no posts this week!  I'm in love with her!  Katelyn Capri was born January 11th and is doing great.  We had her pictures done a few weeks ago by Mary Clark with DMC Studios.  She did a fabulous job and I recommend her!  Check out her blog at photographybydmc.blogspot.com