Tuesday, May 31, 2011

Thank you...

I always like to have thank you and blank cards on hand when needed.  Usually I pay $4 for eight cards that aren't that cute...until I found this darling stationary line at Hobby Lobby!

It's called Fiddlestix Paperie and they have all kinds of stationary/office products. This set of 20 note cards (and cute designed envelopes that match) was $3.99!  There was a set of 20 demask thank you's for $2.99!  And use their 40 percent off coupon for them to be even cheaper! 

I was also looking for a small graduation present and they have a set of three darling journals for $5.99!  They had a few different designs to choose from but I loved these...


All wrapped up and ready to give!  With a little note about keeping a record about your adult life, its a great graduation congratulations! 


I'm so excited to have a place to turn to for inexpensive, yet great looking stationary!  Thanks Hobby Lobby!


Monday, May 30, 2011

Fun find...Forget Me Not in Lehi!

Lisa found the CUTEST and BEST PRICED boutique either of us have been to...Forget Me Not (113 S. 600 E.) in Lehi!  It's located just west of Fresh Market in Lehi (right off the exit across from the Lehi Roller Mills).  They have all kinds of refurbished furniture painted in great colors at amazing prices.  Here are a few things we found...

 Desk $129 and Chair $25...so darling and really wanted to buy it.  May have to go back and see if it's still there!
 Dresser $169...such a great blue color!
 Table...$35 (or somewhere around there!)  What a great deal right!
And my purchase...this darling green chair for $25!  It will go so great with Peyton's new bedding for his new room in the basement (when we get around to moving him down there!)

Lisa found some great things too which I'm sure she'll share soon!  Stop in and take a look and I'm guessing you won't walk out without buying something!  Tell them the Do It Yourself Duo ladies sent you! 

Friday, May 27, 2011

A Sweet Summer Treat


Nothing is better on a Sunday evening in the Summer than apple crisp over ice cream.  I am not a big fan of apples, so I just eat the crisp over the ice cream :)  Here's my favorite, easy recipe: 

Ingredients:
5 cups sliced, peeled apples
2 to 4 T sugar
1 c Quaker oats
1 c brown sugar
1/2 c flour
1/2 t nutmeg
1/2 t ginger
1/2 t cinnamon
1/2 cup melted butter

Mix the oats, brown sugar, flour, nutmeg, ginger, and cinnamon together.  Add the butter stirring until mixture sticks together.  Place peeled apples in a glass dish, sprinkle with sugar, and then add the crisp topping.  Bake at 375 for 30 minutes.  If baking just the crisp, reduce the time to 15 minutes.  Serve with vanilla ice cream immediately!

Thursday, May 26, 2011

Maintenance Free Backyard


Irises are one of my favorite flowers and create a great bright green focal point all summer long.  They require no care and get bigger year after year.


I have them planted all along the rock wall in my backyard.  They are starting to bloom and will last through June.  After the flowers die, you simply cut them off and enjoy the green fronds for the rest of the season.  Plant some today!

Wednesday, May 25, 2011

Best Garden Tool Ever


This handy little tool is my favorite weed picker of all time.  If you have dandelions, this is the only thing that gets to the bottom of the roots and gets rid of them completely!  I bought this little gem at Walmart for $1.  Best dollar I've ever spent!

Tuesday, May 24, 2011

An Array of Color


I love lots of variety and quantity of flowers in my main bed.  My favorites are zinnias, dahlias, geraniums, salvia, vinca, begonias, potato vine, coleus, and a few well placed petunias.  I probably planted over 100 flowers in this bed.  The secret to easy planting is to start farthest back with your tallest flowers.  Lay out the plants in the pattern that you would like then just dig the holes and plant each subsequent "row:.  I say "row" because you don't have to have everything perfectly.  I like to plant about 5 inches in between each flower.  I will use Miracle Grow every three weeks, and if the sun ever decides to shine, my flowers will be full and lush before I know it.  Lowes has a great assortment of beautiful flowers.  I bought mine there and love their product!

Monday, May 23, 2011

Flower Pots

So last year, I wanted to do large flower pots on both sides of my garage door.  When I saw how expensive large planters were at the nursery and Lowes, I almost changed my mind.  Thankfully, IKEA exists.  I found these large terracotta planters for $5.99.


I didn't like the terracotta, so I painted them black.


 Then I filled the bottom third with pea gravel for drainage.


Fill with potting soil (I love Miracle Grow) leaving about 4 inches at the top.


Starting with a spike in the center, arrange your plants from the center out, varying heights and colors.  I chose zinnias, fuschia, potato vine, petunias, verbena, and creeping jenny for my pots.  Once I get the look I want, then I fill in the rest of the space with the potting soil.  Doing it this way, saves time digging holes and creates a compact look.


Here's the finished product.  I am all about symmetry with my pots, so . . .

here's the second one.  Hope this inspires you that large flower pots can be done inexpensively.  Tune in tomorrow, for some great ideas for planting large flower beds.

Friday, May 20, 2011

Chocolate Chip Cookies

Who doesn't love to come home to this sight...

This is the Nestle Tollhouse recipe but I do a few things to it to make them fool proof!  They turn out just about every time!

Chocolate Chip Cookies
1 square butter flavored Crisco (I swear this is the difference!)
3/4 cup brown sugar
3/4 cup white sugar
1 teaspoon vanilla
2 eggs
2 1/4 cups flour
1 teaspoon salt
1 teaspoon baking soda
1/2 bag milk chocolate chips

Mix Crisco, brown sugar, white sugar and vanilla.  Beat eggs in.  Add flour, salt and baking soda (some people say mix the dry seperate and add but I usually just put it all in together).  Mix in chocolate chips.  Drop heaping spoonfuls onto cookie sheet (another trick is I never form them into balls, I just take a scoop and drop it...they seem to turn out better that way for me!)  Bake at 375 for 11 minutes.


Thursday, May 19, 2011

Pinwheels for a Party

My friend Kallee sent me a picture of a darling birthday party table with pinwheels as part of the decor.  I thought I'd go online to find out how you make them...

So easy!  I thought I'd just send everyone to the video tutorial here.  She goes through it pretty quick, but they are so simple...and with the right paper they turn out darling!  I did use floral wire instead of pipe cleaner and a wooden dowel instead of a pencil to make it a little cuter.  Great for an outdoor party decoration...a grouping of three in different sizes and paper types would also be darling in a children's bedroom! 

Wednesday, May 18, 2011

Land o' Candy party idea...darling

I'm debating whether I'm ambitious enough this year to do this for Chayce's birthday, but I have to share because it's SO cute.  And not too hard, just a little time consuming.  It comes from Parents magazine (which if you don't subscribe to it and have kids, you SHOULD.  It's cheap and has lots of great ideas!)  May's issue had five different birthday ideas and this was one of them...

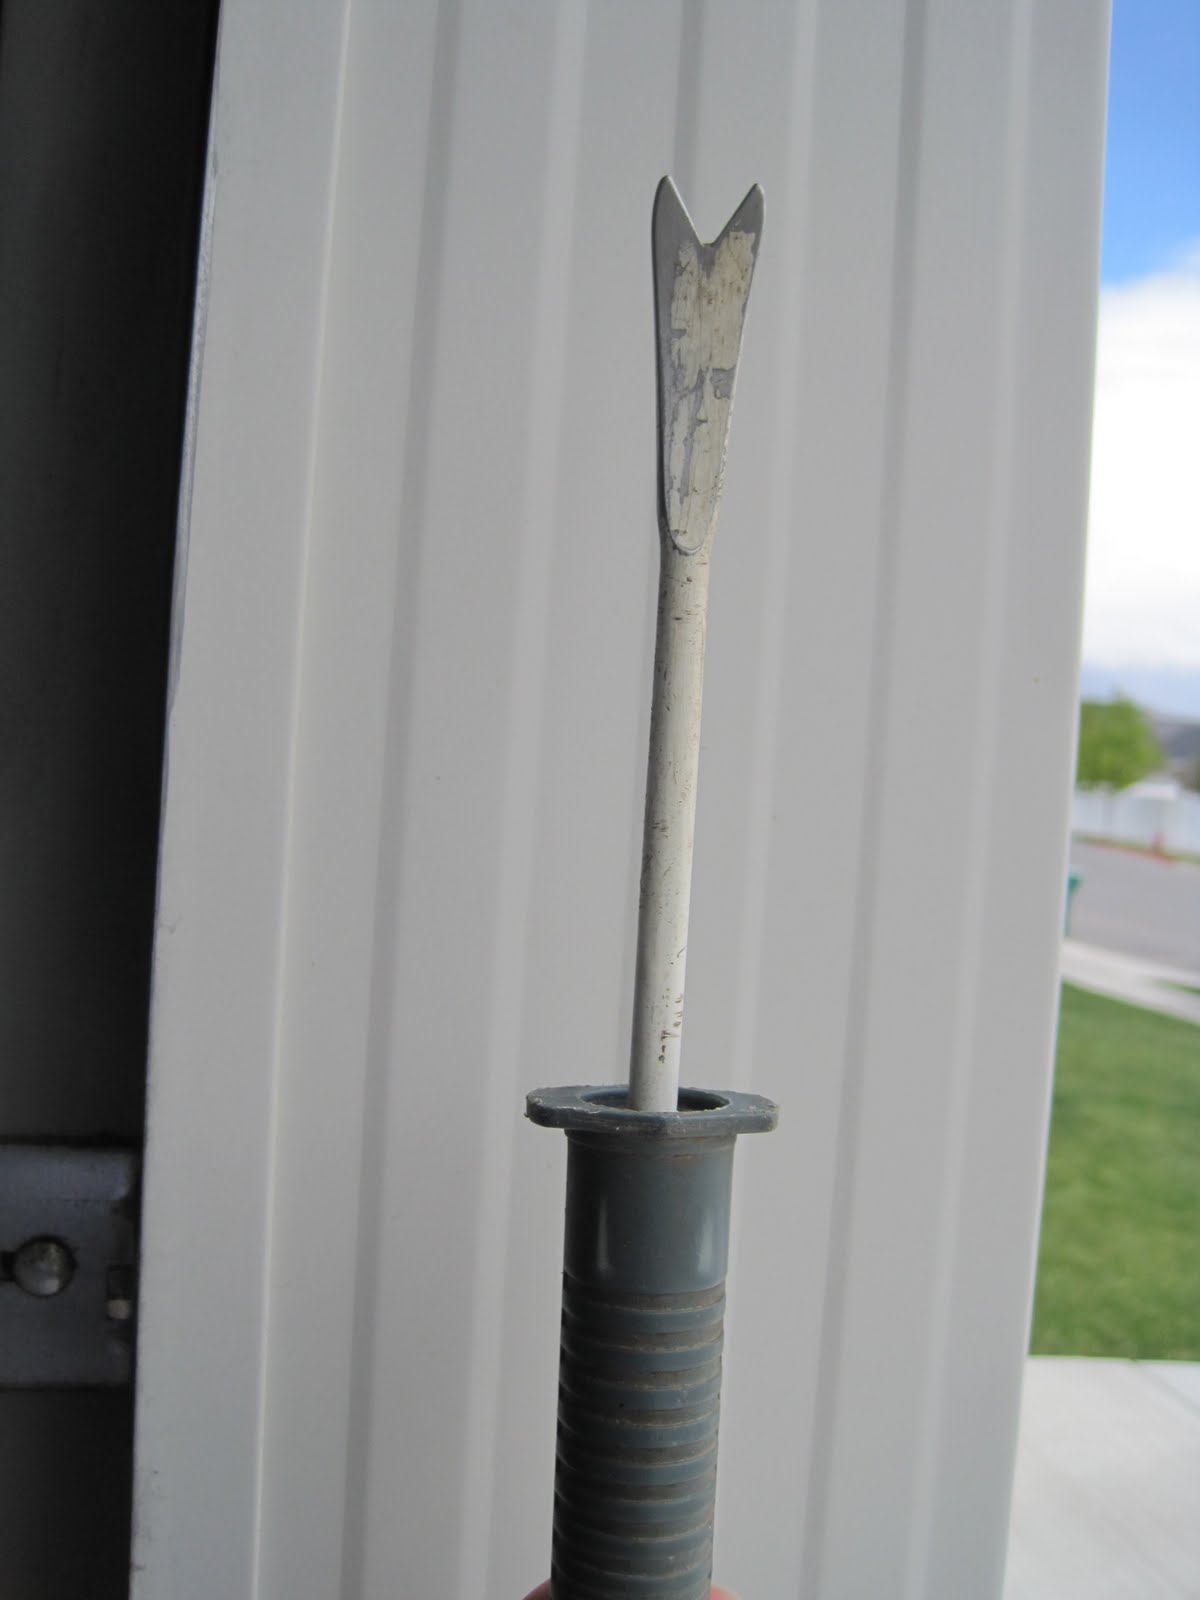
 This is what I love the most...the life-sized suckers! 

Here's their directions on how to make them...

1.  Apply two coats of white paint to empty wrapping paper rolls with craft sponge brush
2.  Blow up balloons, knot the end and to the bottom attach a lenth of ribbon that is about 6" longer than the tube.
3.  Tie the loose end of the ribbon to a paint or glue bottle and drop it into the tube (so it has weight and will drop down). 
4.  Cut the ribbon from the paint or glue bottle, pull it tight and tape to the inside of the tube (the top of the tube should cover the balloon knot).
5.  Cut a 3'x4' piece of cellophane, cinch around the balloon, and tie with ribbon. 
6.  Insert the loose paint or glue bottle in the bottom of the tube to help it stand up.  Secure in place on the floor with strips of tape if necessary.

The cake is darling too...here's the instructions:

1.  For the proper height, you will need two 9" cakes and two 7" cakes stacked on top of each other.  You just need two cakes mixes, just splitting the batter between the two pans each time.  Cut the tops of each cake so they are flat, stack with a light coat of frosting between each and frost the whole cake. 
2.  To make the path, unwrap 3 or 4 fruit chews (Starbursts) and microwave them for 5 seconds to soften.  On a clean surface, roll each one flat with a rolling pin.  Cut them into 1"squares.  Press squares into the side of the cake to make a path that starts at the base and curls up to the top.  Use Pull'n'Peel licorice to outline the path.  Coil a strand into a bullseye and place at the end of the path.
3.  Decorate with candy and gingerbread men cookies as seen.
4.  For the cones, crumble a few cookies into each ice-cream cone to fill the base.  Spoon a dollop of frosting on top to look like ice cream.  Use food coloring for the strawberry color and cocoa for the chocolate color.  Place in cake and scatter sprinkles over the top.

Additional ideas include creating a Candy Land board around the house with construction paper and pulling out the game cards for a life-sized game.  Above the cake is a picture of cute party favors where you let the kids create their own candy rainbow with jellybeans (or M&M's). 

We'll see if this happens this weekend...if not it will someday for sure!

Tuesday, May 17, 2011

One Year Memory Book

We are celebrating my second child's birthday this week so I thought I'd share what I did for his baby book.  I am not much into scrapbooking anymore but thought it would be nice to keep a record of milestones and dates from my kids' first year.  So I bought a blank calendar from Roberts and created pages for each month of the year to document the important stuff...


I used the Roberts 12x12 binder...I think with the coupon you can get them for $9.


Each month has a page and the months with a big holiday or event has an extra page behind it with pictures.


I also hire a photographer to take pictures once a year...it's fun to keep the favorites in this book as well.


At the end of the book I put information about the year they were born.  The sections include:
             All about you (information about their birthday, doctor, hospital etc.)
             Info about the year they were born
             Info about the day they were born (in the news, famous people who share their birthday)
             The cost of familiar items that year (gas prices, home prices, a burger at McDonalds etc.)


While every year after their first is just a book of printed pictures, at least they have a memory of one year they won't ever remember otherwise!

Monday, May 16, 2011

Fun find...summer supply

I've been on the lookout for cute summer outdoor towels at a good price...although they are marked as bath towels, these are nice and big and so cute!


You can't beat $3.98 at Walmart!  Backyard summer fun here we come!

PS...too bad Blogger can't work 100 percent of the time!  I'm sure everyone realized the system was being funky late last week.  Hope its back to normal now!

Wednesday, May 11, 2011

A Quilting Memory

Here is Porter's new bedding for his pirate room.  Yes, I made the quilt.  It was the first one I did using patchwork piecing, and I loved it.  My mom has a new embroidery machine that we used for all the embroidered squares.  I used the same screenprinted "P" on his bed as on the sail.  I fell in love with the striped fabric from Quilting Cottage.  If you haven't been there, you must see their fabric selection.  It is incredible.  To make the quilt, I started by assembling the horizontal rows and then connecting each one. Lastly, I added the sides and back.  I busted out the pillow sham this afternoon. 

I wanted to make his bedding so that he would also have a keepsake to remind Porter of the year of the pirate.  This year, he has dressed like a pirate, acted like a pirate, had to have all kinds of pirate toys, watched "Pirates"; you name it, he's done it.  I am so proud that he'll have this quilt to remind him when he grows tired of the pirate themed room.  So proud of myself and totally checking off my Knowledge project for Personal Progress!

Cheap Book Shelves

Thanks to Lindsay's friend, Sarah McGiven, for this great idea.  These book shelves are super easy and cheap thanks to IKEA.  They are the Bekvam spice racks located upstairs in the kitchen section and are $4.  I have black one's ready to hang on Porter's wall as a spot for his favorite books and as a mock ship's railing as soon as I get Davy's approval.  (He needs a few more days :))  So until then, here's to Sarah's great idea!

Tuesday, May 10, 2011

Setting Sail


I saw this in Pottery Barn and loved it.  However, I wasn't about to pay $99 for it, so I set out to make my own.  I used a round tree stake from Olsen's Nursery ($4), a dowel rod from Lowes ($2), twine,  and black spray paint to make the mast.  I simply used the jute twine to lash the two pieces of wood together.  I could go into ship building I know :).  To make the sail, I purchased a yard of heavy canvas for $10 and had it screenprinted for $15.  Then I used gromets from Hobby Lobby ($6), and shower curtain rings from Target ($6) to finish the sail.  So for a grand total of $43, I got the exact same look as the Pottery Barn inspiration for half the price.  I LOVE IT!!

Monday, May 9, 2011

A Pirate's Life for Me

Porter wanted a pirate bedroom, so I set out to find sophisticated accessories that would last beyond a juvenile themed room.  Enter Hobby Lobby where I found the mirror, ship's wheel, and anchor.  Usually, they will have their wall decor 50% off.  I used three 40% off coupons and spent $80 for all three.  I love the mirror as it reminds me of a porthole.


Check back all this week for the big unveiling!

Friday, May 6, 2011

A light summer dinner

Utah is finally feeling like Spring!  For that reason I thought I'd share a light dinner recipe.  Although its salmon, this recipe gives it a great flavor and masks any "fishy" taste.  My friend Amy also asked for the recipe so I thought this would be a great place to share with all!

Salmon Marinade
 (Photo courtesy of wine-scamp.com)

Salmon fillet
1/3 cup soy sauce
1/3 cup brown sugar
1/3 cup water
1/4 cup canola oil
Lemon pepper and garlic to taste

In a gallon ziplock bag mix soy sauce, brown sugar, water, oil and seasonings.  Place fillet in Ziplock and marinate for 2 hours.  Either bake in the oven at 375 for 15-20 minutes or grill on the barbeque wrapped in tin foil for 20-30 minutes (or until done).

A great vegetable to make with the salmon is asparagus.  My Grandma gave me the idea to cook it this way and it is yummy!
(Photo courtesy of momsinablog.com)

Bundle of asparagus spears
Olive oil
Garlic salt

Cut asparagus in sections (throwing out the bottom part) and place in gallon Ziplock.  Coat with olive oil and shake garlic salt into Ziplock.  Shake to completely cover and marinate in fridge for at least 30 minutes.  Place on tin foil-lined cookie sheet and bake at 400 for 20 minutes.

Thursday, May 5, 2011

Best room in the house

Now that the playroom is finished I wonder where I put all the toys before!  It's so nice to have it organized and in its own room! 


The IKEA organizer is the best!  I'm also impressed that the $8 end table can hold up our beastly box television.  It weighs a ton!


IKEA now sells these great area rugs (they are about 2 1/2 x 2 1/2 feet).  They come in a number of different colors and are soft!


These body pillows are at Walmart for $8 and are perfect for two little heads to lay down and watch a movie or read a few books.  I have a vision to add a little book nook in this area of the room...I will share when its done!

Yes its quite pathetic how many toys we have...but if you ever design a playroom a closet full of shelves is a must!  It is SO great!

I've had friends tell me they have their kids share bedrooms so they don't have to give up the playroom...I can see why!  It's so great and has been a fun space to decorate!  Can't wait to find the last few finishing touches!

Wednesday, May 4, 2011

Playroom collage

When I bought the fabric online I also wanted to buy prints to hang on the wall.  Instead of paying $8-$10 per print I decided to buy a calendar with 12 prints for $14!

The Pottery Barn Kids catalog had this great idea to hang a collage...I really love how it turned out!  The frames are the Ribba frames from IKEA for $10. 

It was pretty simple to do.  First I laid out the photos on the ground to see how far apart I wanted each frame.  Then I measured the total size of the collage and how much space it would take on the wall .  Once I found the center point on the wall I hung the middle picture on the top line as my reference point.  Then I hung the two middle frames followed by the bottom middle frame.  It was easy to build out from there.  I had each frame overlap by 3 1/2 inches. 

These are a few of my favorite Dick and Jane prints...


The nice thing about frame collages is they take up space on a large wall!  My playroom feels much more decorated now!  Photos of the full room coming tomorrow!