Thursday, June 30, 2011

Light Up Your Fourth of July


Two for One
    This simple centerpiece starts with decorating basics -- a glass hurricane and a votive candle. Fill a round glass hurricane with red vase filler (try small beads, pebbles, or sand). Place a white candle inside a smaller votive cup and nestle it in the vase filler. Embellish with a few star cutouts.


It's a Snap
    Take a stroll down the office supply aisle for red, white, and blue rubber bands to decorate candles in a snap. Working from bottom to top, wrap rubber bands in alternating colors around straight-side glass candleholders. Vary widths and colors for interest. Thanks to Better Homes and Gardens for some great ideas!

Wednesday, June 29, 2011

Easy DIY Fourth of July Decorations


Loved this idea of hanging a red metal star on your front door wreath.  TaiPan and Rod Works sell metal stars.


Thought this made a darling and yummy centerpiece for your Independence Day party!  Partyland sells M&Ms bulk in all the colors.

Tuesday, June 28, 2011

Computer problems = unperfect life!

If we can be real with each other on this blog I'm going to be...my computer crashed!  I get to phone the Geek Squad to rescue me!  Hopefully it will resolve quickly and I don't lose all the pictures and home videos saved to my hard drive...with that said it's hard to manage a daily blog with a disfunctional computer...

So today's post is a little sparse...may be able to add a bit soon.  But I wanted to share a cute idea I found in the July issue of Better Homes and Gardens Magazine.  There's an article with darling decorating ideas for the 4th of July with one in particular on page 26 that's cheap, easy and so cute!  They used a bunch of the large paint-chip cards from a paint supply store, cut them into triangles and strung them together to make a banner!  Easy way to create stripes on the pennants and it really is a perfect decoration!  I will do my best to get a picture up so you can see (but if you don't get BHG you should subscribe...not too expensive and great ideas each month!)

Monday, June 27, 2011

Simply Splendid...

Found the cutest boutique a week ago.  I'd never been into Simply Splendid before and they have the cutest stuff!  Really great, unique items (particularly loved their picture frames!) They've recently moved to 67 South Main Street in Pleasant Grove. 

My mother in law bought each of her kids this cute sign from Simply Splendid for Father's Day in honor of her Dad who passed away almost two years ago...

It says "One of the best ways to have a little Heaven in your home is to have someone you Love in Heaven." 

Love it...

Friday, June 24, 2011

Steak Tacos-My favorite Summer meal

My husband makes the best steak tacos.  They are easy to make and super delicious!
Create the marinate by combining: 3T lime juice, 3 T vinegar, 2 T olive oil, ground cumin, garlic salt, ground coriander, chili powder, sea salt, and 1/4 c of your favorite salsa. (The salsa from La Costa in American Fork is to die for!)  Marinate the steak overnight in a Ziploc bag.  Grill at 500 degrees for 4 mins a side for medium.  Let rest for 10 minutes before slicing.
Brush corn tortillas with olive oil and warm on grill.  Serve with guacamole.
To make guacamole:
Mash 2 ripe avocados; Add 1/2 red onion chopped, 2 T fresh cilantro finely chopped, 2 T lime juice, 2 serrano chiles minced, 1/2 t coarse salt, dash of pepper, and 1/2 a ripe tomato, seeds and pulp removed, chopped.

Enjoy!

Thursday, June 23, 2011

Sarah Richardson Inspiration-Mixing Colors

I love how Sarah mixed a whole bunch of different colors in the toss pillows of the couch.  I've always been afraid to mix more than one family of colors, but when I look at how well it works in this room, I know that I can try it in my house.


The same holds true for this room with the yellows and greens mixed in with the deep reds and blues.  Love the tufted couch at the foot of the bed.  I can't wait to have a bedroom large enough to have a tufted chair/chaise.  I am dying to make one, so if anyone wants one in her room, call me!

Wednesday, June 22, 2011

Sarah Richardson Inspiration-Bold Prints

 The fabric in this room is absolutely lovely.  My favorite is the use of such a bold print for the headboard.  (Click here for the tutorial on making your own headboard.)


Similarly, I love the fabric for this headboard.  Hobby Lobby has such a great selection of fun, graphic prints right now.  I spent 30 minutes on Saturday just walking through the fabric section :))  Sarah knows just what fabrics to put together.  To mimic her design, pick a bold pattern, then search for a subtle complement and a basic stripe, dot, or textured fabric.  Lay them on the fabric table in a layer to see how all will look together.  Take out what you don't like until you find your grouping of 3 to 4 fabrics. 

Tuesday, June 21, 2011

Sarah Richardson Inspiration- A bold color


So Sarah Richardson has to be my favorite designer hands-down.  Her style and decorating ability is amazing.  I love her shows on HGTV because I always come away with inspiration.  Today, I wanted to share how she uses a strong color to make a statement in a room.

I love the use of red on the doors and in the carpet on the floor.  It is such a bold statement but works perfectly.  This is a mudroom in her farmhouse, but you could easily recreate it in your home.  I've never thought to paint a door a strong color, but now I am on the lookout in my house for one to paint!


I love the mix of bedding and again the use of red in this room.  The paisley print with the polka dot is a perfect combination.  It shows that patterns can be mixed.

Monday, June 20, 2011

Another Giveaway!

We haven't done a giveaway for a few months.  To be entered for a chance to win a $25 gift certificate to Rod Works you must become a follower.  For those of you who have followed us for months, you can have more chances to win by leaving a comment during the next two weeks, or by getting friends to become followers!  Good luck and thanks for supporting us!

Friday, June 17, 2011

"White Chocolate" Lush

The original name of this dessert is "lemon lush" but I use white chocolate pudding instead.  YUM! 

White Chocolate Lush
Layer #1
1 cup flour
1/2 cup butter
1 tablespoon sugar

Mix until crumbly, flatten in bottom of 9x13 pan.  Bake at 350 for 10-15 minutes until golden brown.  Cool.

Layer #2
8 ounce cream cheese
1 cup powdered sugar
1 medium Cool Whip

Mix cream cheese, powdered sugar and half container of Cool Whip.  Spread on cooled crust

Layer #3
2 boxes instant white chocolate pudding (small size)
3 cups milk

Mix together and pour on top of second layer.  After pudding has set in the refrigerator, top with remaining Cool Whip.  Chill until serving.

Enjoy!  Happy Summer!

Thursday, June 16, 2011

Refreshing Orange Salad

My sister in law Melissa gave me this recipe and it is so yummy!  Light, refreshing and delicious with any summer meal!

Orange Whipped Salad
3 ounce orange jello
3 ounce tapioca pudding
3 ounce vanilla pudding (cook and serve)
12 ounce Cool Whip
15 ounce can mandarin oranges

Bring 3 cups water to a boil and add orange jello, tapioca pudding and vanilla pudding mixes.  Bring to a slow boil stirring constantly.  Remove from heat and cool completely.

Once cool, stir in Cool Whip, mixing well.  Fold in mandarin oranges gently.  Refridgerate for a few hours before serving. 

Wednesday, June 15, 2011

BBQ Ribs and Potatoes

Here's another one of my favorite summer meals...

Ribs are SO easy!  I buy the them country style because they are individually cut and ready to eat!  Brush with barbeque sauce and garlic salt and throw on the grill for 12 minutes per side (or so). 
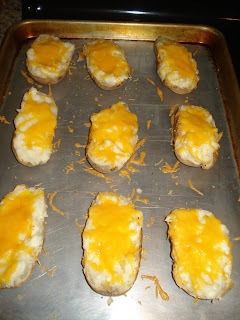
Double-stuffed potatoes are a favorite at our house...potatoes and cheese are always a great combination!  Just bake the potatoes until done, cut in half and scoop out the insides (keeping the form of the skins), mash the potatoes adding a little butter, milk and salt and pepper, scoop back into potato skins, top with cheese and bake for an additional 12-15 minutes.

Tuesday, June 14, 2011

Girls Can Grill Too!

Up until last year I didn't dare touch the barbeque...but once McKay taught me how to turn it on I realized I can do it too!  I still prefer my husband to grill but when he's gone I can hold my own.  There's nothing like barbequed burgers, pasta salad and corn on the cob (or in this case squash) on a summer evening!

The trick to great burgers is the right seasonings...

 We put all the hamburger into a bowl and shake with shown seasonings before shaping into patties.  They always turn out delicious!

Here's a yummy pasta salad recipe my friend Brooke shared with me...

 Tri Color Pasta Salad
1 12 ounce package Pasta Rotini, tri colored, cooked and drained
3 roma tomatoes, diced
1 can black olives, sliced
1/4 cup red onion, finely diced
3/4 cup parmesan cheese
6 fresh basil leaves, cut into strips
4 tablespoons basil pesto
2/3 cup creamy Caesar dressing
2 teaspoons saute spice (equal parts black pepper, salt and garlic powder)
1/2 to 1 cup toasted pine nuts

Cook pasta and coat with Caesar/pesto mix while warm.  Add the rest of the ingredients (without pine nuts) and toss.  Chill.  When ready to serve top with toasted pine nuts.


Summer squash is a great vegetable to add to a barbeque and grilled over the stove with a little salt and pepper makes it delicious!


A delicious summer meal without too much headache (or heat in the kitchen!)

Monday, June 13, 2011

A week of summer eats...

This week I'll be sharing my favorite summer dishes!  I'm starting with a hot dog you MUST eat sometime this summer.  Make your way down to Provo to eat at J Dawgs!

It's located at 858 North 700 East (just South of BYU campus).  I was introduced when I worked in Provo a number of years ago and I was hooked.  They put a special sweet sauce on them and cut the hot dogs as they cook so the sauce fills into them...I promise you won't regret going! 

The restaurant is fairly small and usually always busy so plan a picnic, pick up the dogs and take them to a park!  Fun summer activity!

Friday, June 10, 2011

Who needs Smart Cookie?


 Lindsay and I love a great treat.  Smart Cookie's ice cream sandwiches are the best.  I made my own version this week, and they are divine!  I paired mine with Farr's mint chocolate chip ice cream.  Super yummy.  To make the cookies, mix:
1 box Devil's Food cake mix
2 eggs
2/3 cup shortening
Bake at 375 degrees for 10-12 minutes.  Fill with a scoop of your favorite ice cream, and enjoy! 

Thursday, June 9, 2011

The Big Reveal

This was Khloe's nursery.


This is her big girl bedroom!  Her bed was the steal of the century.  We got it for $200 from DownEast Home in Draper.  It is the Pottery Barn Catalina storage bed.  It retails for $1000.  The reason it was on sale was because it didn't have the screws for the finials.  Davy simply glued a dowel rod in the hole, hammered in a nut, and screwed in the finials.  It was a $8 fix.  Love, love, love DownEast Home.  It is also where we bought the dresser in her room 5 years ago.  Great finds!


Since I moved her lamp to her bedside table/stool, there was a space.  So I moved the pink vase from off her shelf, and picked up the cream iron stand from Rod Works for $18.  I love the height and whimsy it provides.

Thus, on the shelf was a hole from the pink vase.  I found this great birdcage at Osmond Designs in Lehi for $10.  They have great inexpensive accessories.


I found Khloe's bedding at Bed, Bath and Beyond.  I used a 20% off coupon and paid $63 for the twin quilt and sham.  It is the perfect shabby chic vintage look that I wanted.  I absolutely love how her room turned out and that I spent so little on it!  If you look, you can find the deals.  Take me with you any time.


Wednesday, June 8, 2011

Khloe's Big Girl Room-Part 2


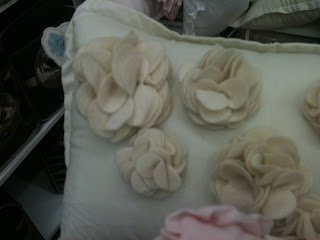
So this pillow was the inspiration for Khloe's pillows.  I wasn't about to spend $30 on a small lumbar pillow, but I loved the felt flowers on it.


I bought $5/yd floral fabric, $8/yd pink quilted fabric, 4 for $1 felt sheets in natural and pink from Hobby Lobby.  I used $3 and $1 pillow inserts from Ikea.  To begin, cut out a flower shape in the felt.


 Fold in half and cut a slit in the center of two flowers.


 Place the slits crosswise to create your flower.  Repeat 3 times.

 Layer your flower and pull the petals in to create the desired look.  Then take a needle and thread and sew up and down through the middle connecting all of the flowers.


Place on your fabric and sew with needle and thread.


To create this look, I used my glass mixing bowls to trace all the different sizes of circles.  Then I simiply attached them together and sewed them on to the pillows.  For a pillow form tutorial, click here.


For this one, I cut out petal shapes and a small circle, layered the petals and sewed all onto the pillow.


I spent $26 and got four unique toss pillows.  So glad I didn't buy a tiny 10" x 20" for $30.

Tuesday, June 7, 2011

Khloe's Big Girl Room-Part 1

So it was time to transition Khloe into a big girl bed.  All of her furniture was this honey color.  At Forget Me Not, I found this darling aqua color dresser (see two pictures below).  It was my inspiration for the room.


So I headed to Lowes, got a color sample (Bay Mist), matched it with the dresser at Forget Me Not and had a perfect fit.


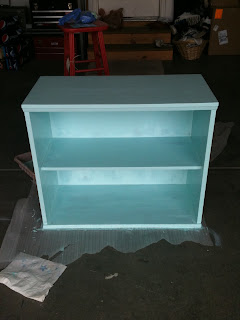
So home I went to sand her bookshelf and paint it the new color.  I loved it.  It took three coats using a foam brush.  Then I used Valspar's spray top coat.  (Notice the salmon colored stool in the background.  I bought it for $15 at Forget Me Not.  It was the perfect bedside table for Khloe's new bed.  Even the color wasn't right, I knew I could paint it.)


Here's the finished book shelf at the foot of her new bed.


Here's the salmon colored stool!  Amazing what paint can do.  I sanded the stool down to the natural wood.  Where I couldn't get all of the salmon color off, I sprayed with white spray paint.  The aqua then covered beautifully.  Khloe's bed is tall, so she needed a tall table.  I loved the delicate legs of the stool and the height was perfect.  $15 made it even better!


She already had the lamp, and the flowers came from my bathroom.  I bought the bird for $3 at Rod Works.  Love my Forget Me Not find!


This chair also came from Forget Me Not.  It was only $25.  I loved the bright hot pink color.  It combined with the aqua provided the perfect punch of color.  Check back tomorrow for a tutorial on how to make the felt flower pillows on the chair.  They were super easy and cheap!

Monday, June 6, 2011

Forget Me Not- Lehi Round Two

So Lindsay posted last week about our favorite new home store.  It is Forget Me Not in Lehi.  I scooped up all of their stools, and a few other gems that I'll share this week.  One of the stools is pictured below.  It fit great with the other items I use for my summer porch display.


(Side note, the red pillow is one I had previously used on my couch a few years ago.  I found it downstairs and thought it would be perfect on the porch.  I was right.  Look through your house and repurpose, repurpose, repurpose!)


This is the stool from Forget Me Not.  It was $16 and is the perfect stool for Mr. Rooster.  Their hours are Wed-Sat from 10-6.  You will love it!  Check back tomorrow for the first installment of Khloe's big girl bedroom makeover!

Friday, June 3, 2011

Cinnamon Rolls...Delicious!

I had never attempted cinnamon rolls before but have always wanted to master them!  I tried the Better Homes and Gardens recipe and they turned out delicious and were pretty easy (don't be intimidated by the many instructions...they are needed and helpful!)  Try them for yourself...


Better Homes and Gardens Cinnamon Rolls
4 3/4 to 5 1/4 cup flour
1 package active dry yeast
1 cup milk
1/3 cup butter
1/3 cup sugar
1/2 teaspoon salt
3 eggs
3/4 cup packed brown sugar
1/4 cup flour
1 tablespoon cinnamon
1/3 cup butter
1 tablespoon half and half or light cream
Vanilla glaze (recipe below)

In a large mixing bowl combine 2 1/4 cups of the flour and the yeast.  In a saucepan heat and stir milk, 1/3 cup butter, sugar and salt just until warm and butter almost melts.  Add to flour mixture along with the eggs.  Beat with electric mixer on low speed for 30 seconds, scraping bowl.  Beat on high speed 3 minutes.  Stir in as much of the remaining flour as you can.

Turn dough out onto a lightly floured surface.  Knead in enough of the remaining flour to make a moderately soft dough that is smooth and elastic.  Shape dough into a ball.  Place in a greased bowl; turn once.  Cover and let rise in a warm place until double (about an hour).

Punch dough down.  Turn out onto a lightly floured surface.  Divide in half.  Cover and let rest for 10 minutes.  Meanwhile, lightly grease two 9 inch round baking pans or 2 baking sheets, set aside.  For filling stir together brown sugar, the 1/4 cup flour and cinnamon.  Cut in 1/3 cup butter until the mixture resembles course crumbs.

Roll each half of dough into a 12x8 rectangle.  Sprinkle filling over dough rectangles.  Roll up each rectagle starting from a long side.  Seal seams.  Slice each roll into 12 pieces.  Place cut sides down in prepared pans or baking sheets.

Cover dough loosely with plastic wrap, let dough rise in a warm place until nearly double, about 30 minutes.

Break any surface bubbles with a greased toothpick.  Brush dough with half and half.  Bake at 375 for 20-25 minutes or until light brown.  Remove from oven and brush with half and half again.  Cool for 1 minute.  Carefully move rolls to wire rack to cool slightly and drizzle with vanilla glaze.  Serve warm.

Vanilla Glaze
In a small bowl stir together 1 1/4 cup powdered sugar, 1 teaspoon light corn syrup, and 1/2 teaspoon vanilla.  Add enough half and half or light cream (1-2 tablespoons) to reach drizzling consistency.

Thursday, June 2, 2011

labels...

Better Homes and Gardens provides these darling labels for free on their website!  They have quite a few different ones to choose from.  You have to register on their site (which is a great one to be a part of) and it will take you through how to print them off. 

Organizing toys, mud rooms, bedroom closets and pantries is so much easier with these...and makes it so much cuter too!

They are available at www.BHG.com/labelkit.  Happy organizing!