I went to Roberts on Black Friday for a 12x12 binder and also came away with this...
I'd been looking for a frame like this to go along one of baby girl's walls and this one was perfect. This line carries really cute chipboard frames in a few different styles (including the cute oval shape). With a 50 percent off it was $5.50!
Covered with some paper and a cute little saying I love, it turned out great!
I know I've been teasing about showing the nursery for awhile. Still waiting to decide if we are going to paint the crib. So the bedding isn't in yet. But it will have to be done sooner than later so pictures will be coming in short order!
Showing posts with label Craft. Show all posts
Tuesday, November 29, 2011
Thursday, May 19, 2011
Pinwheels for a Party
My friend Kallee sent me a picture of a darling birthday party table with pinwheels as part of the decor. I thought I'd go online to find out how you make them...
So easy! I thought I'd just send everyone to the video tutorial here. She goes through it pretty quick, but they are so simple...and with the right paper they turn out darling! I did use floral wire instead of pipe cleaner and a wooden dowel instead of a pencil to make it a little cuter. Great for an outdoor party decoration...a grouping of three in different sizes and paper types would also be darling in a children's bedroom!
Labels:
Craft
Thursday, April 7, 2011
Windmills and Banners
Our friend Stephanie (with this beautiful home) makes the cutest banners for each holiday. She and a group of friends get together once a month to scrapbook and once a year they each bring a designed banner for different holidays...great idea right! This one was made by Missie Rudy and it is darling! You can find these in a bunch of etsy shops...but you can make one yourself!
Steph gave me a tutuorial on how to make the windmills...they look so cute on this and can also be used to embellish lots of things.
Start by getting a book you can tear up a little bit. Stephanie found an old dictionary at DI for .50 cents. I used the back of one of my books that had an excerpt from an upcoming book that I didn't care to keep. After I made mine I realized it works better if you trim the page first so the words are even on all sides of the paper.
Fold the paper long ways (not side ways) accordian style in a fairly tight fold...
Flatten all the folds together and fold the strip in half...
Holding the middle part together, fan out the rest of the pieces to form a half circle. Hot glue the top middle pieces of each side so they stay together in the fan shape. Repeat this process again for the bottom half of your windmill.
Hot glue the long side of one of the windmills to stick each side together...
Each side will be a little bit loose so hot glue the next layers up together (on both sides) so it stays tight in the middle...
Make a second colored windmill to layer over the first cutting the paper down 1 inch from the size of your printed paper. Embellish with something in the middle and all done!
Here are a few up close shots of Missie's banner and where she placed the windmills. I love the little bird!
To attach each flag together Missie used a thicker ribbon and layered a decorative ribbon on top. She used layers with different materials and paper in different yet coordinating patterns to give it dimension and amazing style!
Thanks for sharing your great idea Missie and Steph. What talent! I've caught the bug to start making these for each holiday! I've also seen these made for kids birthdays which makes for a fun party decoration!
Steph gave me a tutuorial on how to make the windmills...they look so cute on this and can also be used to embellish lots of things.
Start by getting a book you can tear up a little bit. Stephanie found an old dictionary at DI for .50 cents. I used the back of one of my books that had an excerpt from an upcoming book that I didn't care to keep. After I made mine I realized it works better if you trim the page first so the words are even on all sides of the paper.
Fold the paper long ways (not side ways) accordian style in a fairly tight fold...
Flatten all the folds together and fold the strip in half...
Holding the middle part together, fan out the rest of the pieces to form a half circle. Hot glue the top middle pieces of each side so they stay together in the fan shape. Repeat this process again for the bottom half of your windmill.
Hot glue the long side of one of the windmills to stick each side together...
Each side will be a little bit loose so hot glue the next layers up together (on both sides) so it stays tight in the middle...
Make a second colored windmill to layer over the first cutting the paper down 1 inch from the size of your printed paper. Embellish with something in the middle and all done!
Here are a few up close shots of Missie's banner and where she placed the windmills. I love the little bird!
To attach each flag together Missie used a thicker ribbon and layered a decorative ribbon on top. She used layers with different materials and paper in different yet coordinating patterns to give it dimension and amazing style!
Thanks for sharing your great idea Missie and Steph. What talent! I've caught the bug to start making these for each holiday! I've also seen these made for kids birthdays which makes for a fun party decoration!
Labels:
Craft
Wednesday, December 22, 2010
Making that Special Gift
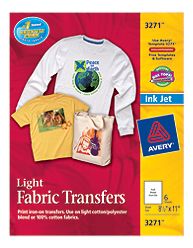
If you can't think what to give that person in your life that has everything or is SUPER hard to buy for, consider making him/her a personalized gift this year using: Avery's Light Fabric Transfers.
They are simple to use and turn out great.
I used them to make my own vintage hot cocoa bags for Davy's work party. Simply find an image that you like, place the Avery 3271 sheet facedown in your printer and print the image. Next, cut out your image and find your fabric, whether it be a t-shirt, fabric bag, etc. Using a hot iron, iron the paper side of the Avery image onto your fabric. (Detailed instructions are included and are very easy). After 40 seconds of ironing and 2 mins of setting time, peel off the paper, and voila: you have your image! You could frame your favorite image, sew it for a pillow, ornament, etc. I used muslin and sewed the bags in about 3 mins! This is a great project and a great idea for that last minute gift! You can buy the Avery Fabric Transfer paper at Walmart on the office supply aisle for $7.
Labels:
Christmas Gift,
Craft
Subscribe to:
Posts (Atom)